


Building with Ant
March 22, 2014 by Vinicius Isola
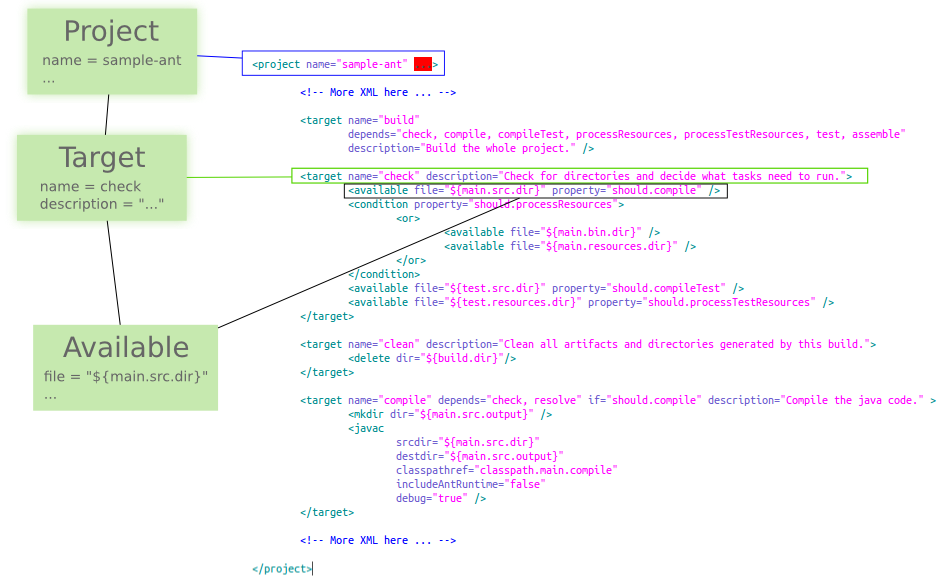
Ant has been around for a while now (first released in 2000) and it can be compared with a scripting language written in XML. XML tags are translated to Java objects and executed calling methods in the objects created. The following image illustrates the relationship between the XML and the Java objects:
A project built with Ant begins with a build.xml file where you describe all targets. A target is a set of tasks and can depend on other targets. When you run an Ant build, you tell it what target you want to execute. Ant then creates a target dependency tree for your project, calculates the least amount of targets necessary to get to the requested target and starts executing them from the target that has no dependencies. The build is considered finished when the requested target gets executed or some target failed.
In this post I’ll explain the two things that I found not so well documented and lacking clear explanation on how to do it: dependency management and code coverage measurement with Jacoco. This was part of the project that I worked on to compare the three mainstream Java build tools. The code for this post can be found in my github repository.
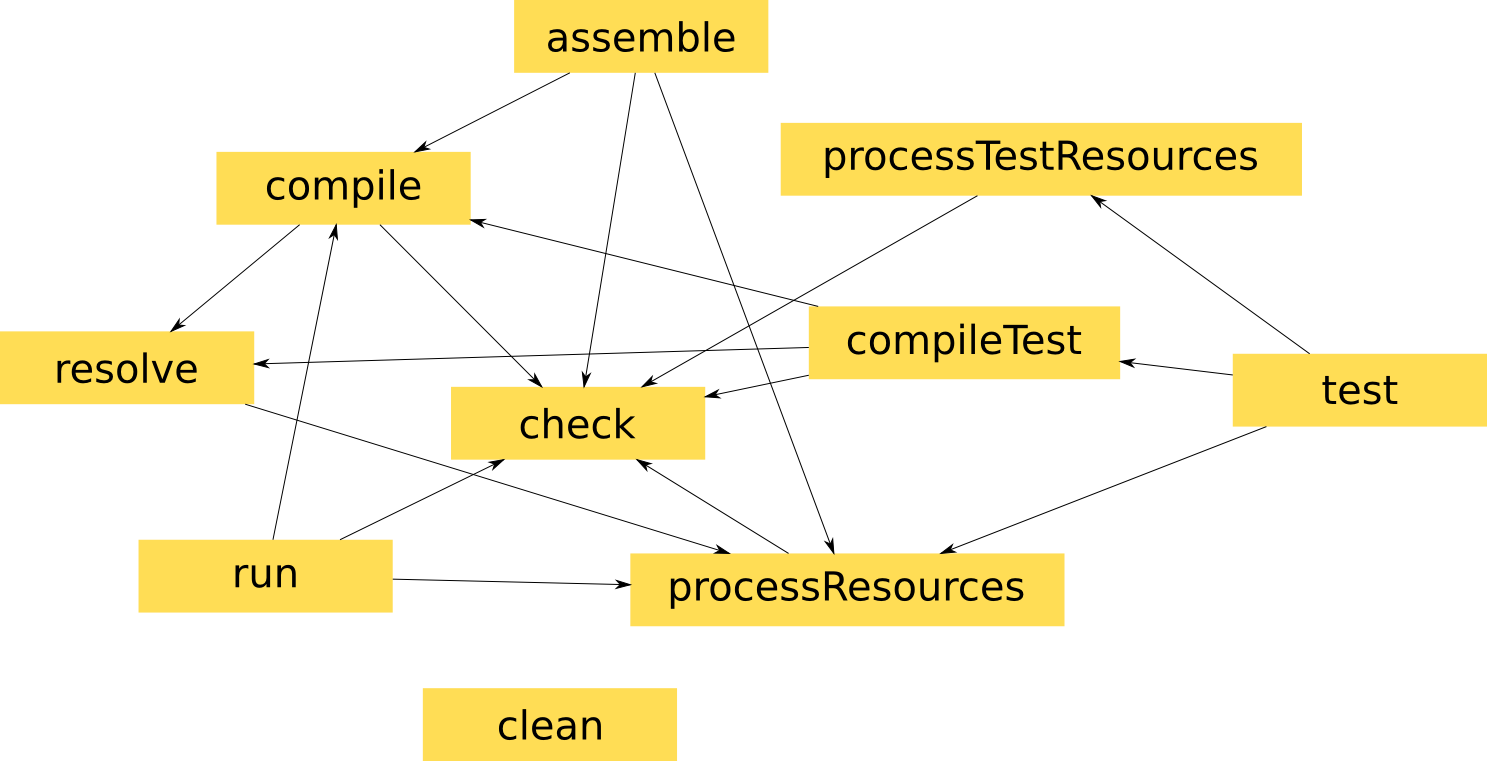
Target Dependency
As explained before, targets in Ant can have dependencies and that dependency influences what is executed in each build. The following is a diagram of the dependency relationship for the targets in this project. This is what Ant will use to chose what targets need to be executed when you ask it to execute some target. I didn’t include the build target to avoid making the diagram even more cluttered.
Ant Build and pre-requisites for this code
Building with Ant is straightforward. There’s not much to learn, there are only tasks and the task attributes that you need to setup. Ant won’t do anything for you if you start with an empty build file. And that’s what attract many people to Ant: simplicity and flexibility. Because Ant doesn’t do anything for you, it will only do what you ask it for. That means that you have total control of what will be done and in what order. Some people don’t like the magic that happens behind the scenes on other build tools.
For the code from this post, besides Ant, you’ll also need Ivy, which does the dependency management for Ant. To make it work, you download Ivy and copy the the .jar file into the lib directory in your Ant installation.
You’ll also need the Jacoco Ant extension for code coverage. Which you can find in the .zip file from Maven central.
To use the two extensions (Jacoco and Ivy) you add the namespace to your build.xml:
<project name="sample-ant" default="build"
    xmlns:ivy="antlib:org.apache.ivy.ant"
    xmlns:jacoco="antlib:org.jacoco.ant">
This will import all tasks from those two libraries into the specified namespaces.
Dependency Management
To manage your dependencies with Ivy, you have to add an extra ivy.xml and add the dependencies you need there. To get the same scenarios we have with Maven and Gradle, where you have different classpaths and dependencies for compile, runtime, compile test and run test I used Ivy’s configurations which represent a group of dependencies. I added four configurations:
<configurations>
  <conf name="compile" description="Configuration for compile time."/>
  <conf name="run" extends="compile"
    description="Configuration for runtime."/>
  <conf name="testCompile" extends="compile"
    description="Configuration for compile time for unit tests."/>
  <conf name="testRun" extends="run,testCompile"
    description="Configuration for unit test runtime."/>
</configurations>
Ivy’s configurations can extend each other so that you don’t need to declare dependencies from compilation on runtime, the ones from compile in test compile and so forth. Next step is to define your dependencies. Something like the following:
<dependencies>
  <dependency org="org.hibernate"
    name="hibernate-entitymanager"
    rev="4.2.5.Final"
    conf="compile->compile" />

  ...
</dependencies>
The last step is to add the retrieve task to some of your target (in your build.xml), like the following:
<target name="resolve" description="Retrieve Ivy dependencies.">
  <ivy:retrieve pattern="${lib.dir}/[conf]/[artifact]-[revision].[ext]" />
</target>
Then, when you run your build, you’ll see Ivy retrieving your artifacts:
[ivy:retrieve] downloading http://repo1.maven.org/maven2/org/jboss/spec/javax/transaction/jboss-transaction-api_1.1_spec/1.0.1.Final/jboss-transaction-api_1.1_spec-1.0.1.Final.jar ...
[ivy:retrieve] ................. (24kB)
[ivy:retrieve] .. (0kB)
[ivy:retrieve] 	[SUCCESSFUL ] org.jboss.spec.javax.transaction#jboss-transaction-api_1.1_spec;1.0.1.Final!jboss-transaction-api_1.1_spec.jar (293ms)
In this case, I set Ivy to put the artifact into the lib directory, which is inside the build directory. I also set it to separate the artifacts in different directories per configuration (pattern attribute). Which means that at the end, you’ll see the following in the lib directory:
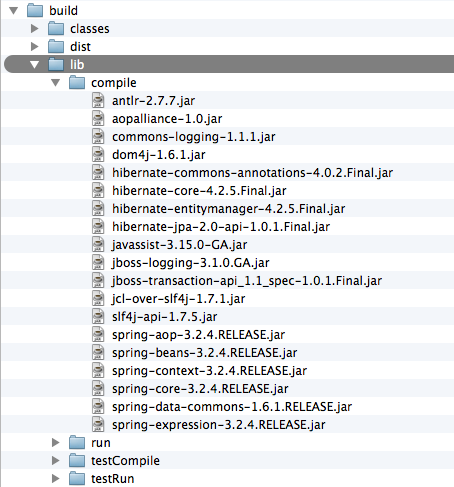
Jar files are copied in each directory, accordingly to each configuration hierarchy. If two configurations have the same artifact, they will be duplicated in each configuration’s directory, but Ivy will only download them once into the cache (~/.ivy2 directory).
Test Coverage
For the test coverage, Jacoco comes with the task jacoco:coverage that wraps your unit test task enhancing the classes so that the test execution will be tracked by it and the coverage stored in the .exec file. This file is not readable so we also have to use the jacoco:report which will generate a human readable report from the file.
The XML will look something like this for wrapping your unit test task:
<jacoco:coverage output="file" destfile="${reports.dir}/jacoco.exec">
    <junit fork="yes" dir="${build.dir}/temp" failureproperty="testFailed"
            tempdir="${build.dir}/temp">
         ... JUnit Task configuration here ...
    </junit>
</jacoco:coverage>
For the Jacoco Report, you should do something like the following:
<jacoco:report>
    <executiondata>
        <file file="${reports.dir}/jacoco.exec"/>
    </executiondata>
    <structure name="${ant.project.name}">
        <classfiles>
            <fileset dir="${main.src.output}">
                <include name="**/*.class"/>
            </fileset>
        </classfiles>
        <sourcefiles>
            <fileset dir="${main.src.dir}">
                <include name="**/*.java"/>
            </fileset>
        </sourcefiles>
    </structure>
    <html destdir="${reports.dir}/jacoco"/>
</jacoco:report>
This tells Jacoco where to find the .exec file, what is in the classpath and what is the source directory of the classes that should be tracked. It also tells that the report should be generated in HTML format (rather then XML or any other) and where to put it.
To run the unit tests with code coverge, just call ant build or ant test and you’ll see something like the following in the console:
test:
[jacoco:coverage] Enhancing junit with coverage
[junitreport] Processing .../build/reports/test/TESTS-TestSuites.xml to ...
[junitreport] Loading stylesheet jar:file:.../org/apache/tools/ant/taskdefs/optional/junit/xsl/junit-frames.xsl
[junitreport] Transform time: 299ms
[junitreport] Deleting: /var/folders/...
[jacoco:report] Loading execution data file .../ant/build/reports/jacoco.exec
[jacoco:report] Writing group "sample-ant" with 3 classes