


Simple Caching with Spring
July 22, 2012 by Vinicius Isola
This week an old friend contacted me because he was having memory problems in one of his applications. The problem was very simple: for each user logged in, all application menus and part of the list/combo values were being added to the user session (including some images). That was used to makes things faster, to avoid going to the database multiple times and loading the data all over again.
The problem with that approach is that each user will have a copy of the data in memory. And in this case, it’s the same data, copied over and over again. After some time, if traffic increases, the JVM will run out of memory. And the situation gets worth when users don’t click the logout button/link, meaning that the session will get stuck until the timeout period has finished.
To help him I wrote a simple example - that was extended in this post - to demonstrate one approach (there are certainly many others) to cache data in a Spring application. What this example will show is how you can use an extra bean to keep the data cached and up-to-date at the same time.
Source code for this example is in my github repository under the folder simple-cache.
This post is not about the new Cache Abstraction provided in Spring 3.1.
Architecture
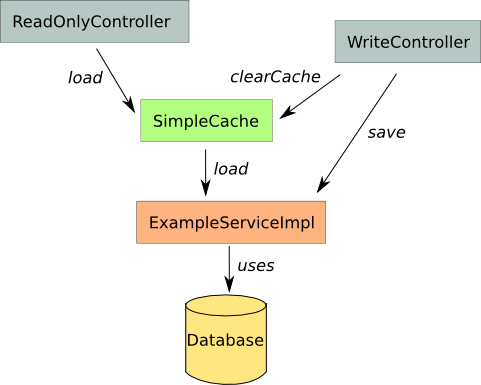
This application is very simple. It contains only two controllers, one that saves data WriteController in the database and one that loads data ReadOnlyController from the cache. The one that saves data also needs to clear the cache to make sure that everyone is getting data that is up-to-date.
Between the read-only controller and the service there’s the cache SimpleCache that stores the data from the service and can be cleared to force a reload the next time data is accessed.
The following illustration shows how all classes are related:
Loading Data
After starting Tomcat with the application installed and going to http://localhost:8080/spring-simple-cache/ you’ll see the following:
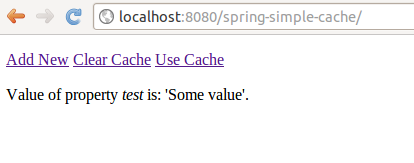
And this is what you’ll see in the console:
Controller: /example
Cache: Reading property test...
Cache: Checking if data is loaded...
Cache: Loading data...
Service: Loading data from database...
Service: Finished loading data.
Cache: Data loaded.
387 ms to process http://localhost:8080/spring-simple-cache/
This was the first time you accessed the page so it needed to load the data from the service. In the service I added a delay to simulate a performance hit because using a memory database is as fast as loading from the cache. To do that, I added a Thread.sleep(200); instruction in the load method. If you load the same page again (hit F5) you should notice a significant performance improve and the page loads almost instantaneously. You’ll also notice a different output in the console:
Controller: /example
Cache: Reading property test...
Cache: Checking if data is loaded...
Cache: Don't need to reload data.
6 ms to process http://localhost:8080/spring-simple-cache/
Now you can see that the data wasn’t loaded from the service, the cache already had the data and that’s what has been returned.
Saving new data
When new data is added through the WriteController, the cache needs to be clear. To see how this works you can go to the add.do action and you’ll get a form to fill out. Fill it out and submit it. You’ll get a message saying that the data was saved. If you go to the console you’ll see the following:
Controller: /save
Cache: Clearing cache data...
Cache: Cache data cleared.
15 ms to process http://localhost:8080/spring-simple-cache/save.do
That shows that the save action was executed and that the cache was cleared. If you try accessing the Use Cache link again, you’ll see in the console that the data was reloaded from the service:
Controller: /example
Cache: Reading property test...
Cache: Checking if data is loaded...
Cache: Loading data...
Service: Loading data from database...
Service: Finished loading data.
Cache: Data loaded.
206 ms to process http://localhost:8080/spring-simple-cache/example.do
Configuration
All the important configuration is in the /WEB-INF/spring-servlet.xml file.
The first thing we need is to make sure that Spring will autowire everything, so we add the following:
<!-- Enable configuration using annotations -->
<context:annotation-config />
Then we create the datasource that will generate the connection with the database. An in memory H2 database is being used:
<!-- Data source, memory database with H2 -->
<bean id="dataSource" class="org.apache.commons.dbcp.BasicDataSource" destroy-method="close">
	<property name="driverClassName" value="org.h2.Driver" />
	<property name="url" value="jdbc:h2:mem:example" />
	<property name="username" value="sa" />
	<property name="password" value="sa" />
</bean>
We need to tell the dispatcher servlet where to find our controllers and views. These are the lines that do that:
<!-- Package to scan for controllers -->
<context:component-scan base-package="com.bearprogrammer.blog.spring.cache" />

...

<!-- View resolver that will load JSP files from the /WEB-INF/jsp folder -->
<bean id="viewResolver" class="org.springframework.web.servlet.view.UrlBasedViewResolver">
	<property name="viewClass" value="org.springframework.web.servlet.view.JstlView" />
	<property name="prefix" value="/WEB-INF/jsp/" />
	<property name="suffix" value=".jsp" />
</bean>
The last configuration needed is the one that load the actual beans. SimpleCache and the service implementation:
<!-- Cache instance -->
<bean id="cache" class="com.bearprogrammer.blog.spring.cache.SimpleCache" />

<!-- Start the service and call its initialize method -->
<bean id="service" init-method="initialize"
	class="com.bearprogrammer.blog.spring.cache.ExampleServiceImpl" />
To initialize the database, the initialize method is called in the service implementation. And that’s it! Spring will autowire everything you need!