


Customizing Spring Security
July 20, 2012 by Vinicius Isola
Spring Security is a very powerful and customizable security framework for JEE applications. This post will show how to integrate it seamlessly with your application setting up a custom login and logout.
You’ll also learn how to add a custom filter with very specific behavior and how to integrate with Spring Data so that your users can be loaded from a repository and avoid all the hassle of dealing with JDBC or Hibernate.
The code for this example can be found in my GitHub Repository. For this post, there are three projects involved: root, spring-security-first-user and user-model. The root project contains dependency management and the user-model can be reused for any other project involving spring security.
Spring Security Basics
Spring Security uses three main interfaces to define the [UserDetails](http://static.springsource.org/spring-security/site/docs/3.1.x/apidocs/org/springframework/security/core/userdetails/UserDetails.html, the GrantedAuthorities and how a user can be loaded from the UserDetailsService. When you create your application, the only thing you need to do is map whatever user and authority control that you have to those that Spring Security has. And because they are interfaces, you just need to implement them. It doesn’t matter where your data comes from, as long as you follow these rules.
The basic architecture for a web application that uses Spring Security is the following:
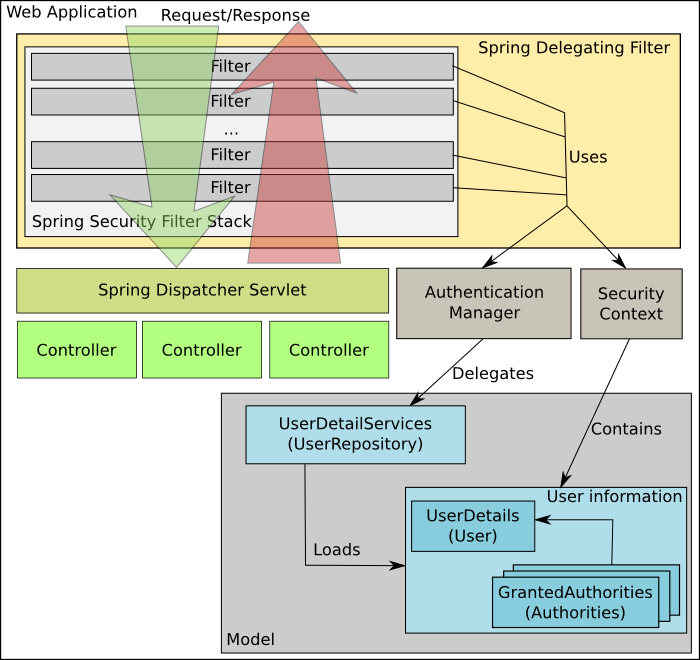
A filter stack is created to handle all access to the application. An AuthenticationManager loads the user and his authorities. A HTTP session is always created and even anonymous users can be handled because a session is created independently of the user credentials.
A SecurityContext stores the security information for the specific user and it is stored in the ThreadLocal (though it can be handled differently for non-JEE applications). With the security context ready, filters in the stack will decide what controller/page that user has access to and if an authentication is required, it will redirect to the login page. If the user is already logged in but doesn’t have the correct credentials, a 403 will be issued.
Spring Data Integration
To integrate Spring Data with Spring Security, all you need is to make sure that your repository also extends the UserDetailsService interface, which means that you’ll need to implement one extra method. This method is the loadUserByUsername, that maps directly to the findOne with one difference: it must throw an exception if the user is not found (instead of returning null). The following is the implementation in the custom repository:
public User loadUserByUsername(String username) throws UsernameNotFoundException {
	User user = entityManager.find(User.class, username);
	if (user == null) throw new UsernameNotFoundException("Username not found: " + username);
	return  user;
}
All the code that you need to create users and authorities is in the user-model project. In this project there are two repositories but only one is used in this example: UserRepository. The custom implementation handles password hashing and also changing password. The save method doesn’t change the password, to change it, you need to go through the changePassword method and provide the old one. There is a bunch of unit tests implemented to help understand the expected behavior.
The user-model project also contains a /META-INF/spring/services.xml that configures Spring Data JPA to initialize the repositories correctly. To make it work you just need to import that file in your spring configuration and add all the Hibernate/JDBC configuration. An example of the extra configuration can be found in the test-context.xml, that’s the configuration file used for the unit testing.
Glueing things together
The spring-security-first-user project contains the full/working application. It is a simple web application that contains three Spring configuration files:
config.xml- Web application context configuration. Contains all configuration necessary to manage Hibernate, JDBC and transactions.servlet.xml- Dispatcher servlet configuration. Contains the controllers mapping and view handler.security.xml- Spring Security configuration. Contains what will be explained in this post!
web.xml
The web.xml configure Spring context listener, Spring MVC dispatcher servlet and also the delegating filter. The only important detail in this file is the path to the configuration files, that are customized for both, the context listener and the dispatcher servlet.
Configuring the AuthenticationManager
The authentication manager is the part of Spring Security that will load your user and check his password. To do that, you need to tell where the data will come from (it can come from many different places). You also need to say what password hashing mechanism you’ll be using.
In this example, the data will come from the UserRepository and SHA-1 will be used to hash the password. It’s also necessary to configure what it’s going to be used as the salt for the hashing. The following is the configuration mentioned.
<!-- Using a SHA-1 password encoder -->
<beans:bean id="passwordEncoder" class="org.springframework.security.authentication.encoding.ShaPasswordEncoder" />

...

<authentication-manager>
	<!-- Using the customized user repository as the authentication manager. -->
	<authentication-provider user-service-ref="userRepository">
		<!-- Password encoder is configured above. -->
		<password-encoder ref="passwordEncoder">
			<!--
				It will use the username as the salt, this is important because its the behavior in
				the save method of the customized user repository. If not setup correctly, it will
				never match the password.
			-->
			<salt-source user-property="username" />
		</password-encoder>
	</authentication-provider>
</authentication-manager>
Two things worth mentioning here. First is that the username is being used as the salt because that’s what’s implemented in the save method of the UserRepositoryImpl. Second, the reference for the UserRepository is created by Spring Data JPA using the default naming convention. That happens when you add the repository declaration, like the following (from the services.xml in the user-model project):
<jpa:repositories base-package="com.bearprogrammer.user" />
Custom login and logout pages
Custom login and logout pages is a very common scenario because normally a web site/application already have a defined template that needs to be followed. Spring Security provides a default login page but allows you to change it to point to whatever page/action you want.
For this example login.do will be used as the login page and logout.do as the logout page. The following is the configuration for that.
<!--
	auto-config="true": auto configure as far as possible
	use-expressions="true": use expression to determine who can access what
-->
<http auto-config="true" use-expressions="true">
	...

	<!--
		Configure the custom login page.
		login-page="/login.do": where the user will be redirected when
		a login page needs to be rendered
	-->
	<form-login login-page="/login.do" />

	<!--
		Configure the custom logout page.
		invalidate-session="true": invalidate user session after logout
		logout-success-url="/logout.do": where the user will be redirected to
		after a successful logout
	-->
	<logout invalidate-session="true" logout-success-url="/logout.do" />
</http>
The first user problem
One recurrent problem every time you start a new application with Spring Security is that normally, you don’t have a user in the database so you need to create a user using some special environment (disabled security for example) and then copy that for each new environment you install your application. That’s needed because most of the time it’s hard to reproduce the exact hashing mechanism used in the application security.
Recently, working with content management applications like Wordpress and Joomla I’ve seen how easy it is to get those up and running. Just start it and when you first get in you get a huge form with all the information the application needs to set it up, including the administrator’s user and password. So I decided that it would be nice to have a way to make that same procedure in Spring Security.
To do that, I added one filter to the Spring Security’s stack that to check how many users exist in the database. That value is stored when the filter is initialized.
After it is initialized and contains the count of users in the database, the filter needs to check that number and if it’s equal to zero (no users) redirect the user to the create first user action. It also needs to check if it is not already in that action to avoid a recursive loop. If there is any user in the database, then it becomes a pass-through filter.
The following is the code in the doFilter of the filter:
public void doFilter(ServletRequest request, ServletResponse response, FilterChain chain) throws IOException, ServletException {
	HttpServletRequest httpRequest = (HttpServletRequest) request;

	// If no user in the database, add first user authentication
	if (userCount == 0) {
		SecurityContextHolder.getContext().setAuthentication(FIRST_USER_AUTHENTICATION);
		// If going into first user create or save page, let it pass
		if (httpRequest.getRequestURL().toString().endsWith(FIRST_USER_CREATE_URL) ||
				httpRequest.getRequestURL().toString().endsWith(FIRST_USER_SAVE_URL)) {
			chain.doFilter(request, response);

			// If just saved first user, update user count
			if (httpRequest.getRequestURL().toString().endsWith(FIRST_USER_SAVE_URL)) {
				updateUserCount();

				// Clear security context
				SecurityContextHolder.getContext().setAuthentication(null);
			}

		// Otherwise, redirect to first user create page
		} else {
			HttpServletResponse httpResponse = (HttpServletResponse) response;
			httpResponse.sendRedirect(httpRequest.getContextPath() + FIRST_USER_CREATE_URL);
		}

	} else { // If there's already a user in the database
		chain.doFilter(request, response);
	}
}
If it’s trying to create the first user, a temporary authentication with the correct user and authority needs to be created, as if it was a real user logged in. That Authentication is implemented in the FirstUserAuthentication and is added to the security context in the following code:
SecurityContextHolder.getContext().setAuthentication(FIRST_USER_AUTHENTICATION);
The Filter Stack
For this filter to work correctly, we need to add it to the filter stack. The first thing we need to define is where in the stack is the correct place to put your custom filter. For this filter a security context is needed so it needs to come after the SECURITY_CONTEXT_FILTER, where the context is created or restored (from a session). But it needs to come before Spring Security tries to authenticate the user (we know that there is no user in the database), so it needs to come before FORM_LOGIN_FILTER. To do that, you just need to add the custom-filter tag using the before attribute:
<!-- Custom filter bean -->
<beans:bean id="createFirstUserFilter"
	class="com.bearprogrammer.spring.security.firstuser.filter.CreateFirstUserFilter"
	init-method="start" />

<http auto-config="true" use-expressions="true">
	...
	<!--
		This is where the custom filter is being added. It's being added
		just before authentication happens, that way, we already have a
		valid security context but not tried to authenticate yet.
	-->
	<custom-filter ref="createFirstUserFilter" before="FORM_LOGIN_FILTER"  />
	...
</http>
If you want more information about the custom filter namespace, you can go here. And detailed information about each one of the core filters, here.
One last thing
Don’t forget to map the correct access to each resource. Login and logout pages need to be accessed by people that aren’t logged in. Everything related to the first user creation, needs the correct authority. And last, but definitely not least, all pages need an authenticated user. The following is that configuration:
<http auto-config="true" use-expressions="true">
	<!-- Pages that everyone can access -->
	<intercept-url pattern="/login.do" access="isAnonymous()" />
	<intercept-url pattern="/logout.do" access="isAnonymous()" />

	<!-- First user creation -->
	<intercept-url pattern="/firstUser/**" access="hasRole('firstuser')" />

	<!-- All other pages needs an authenticated user -->
	<intercept-url pattern="/**" access="isFullyAuthenticated()" />
	...
</http>