


Beginning with Maven and M2
June 3, 2012 by Vinicius Isola
Apache Maven, in my opinion, is one of the most controversial tools around. From my experience, there are three kinds of developers today: those that never heard about Maven, those that hate it and those that can’t live without it. For a long time I was in the second group and I just recently turned to the third one, and I’m slowly dragging all my fellow programmers with me!
At first I was reluctant but then, at work, forced to make Java more efficient and develop at a faster pace, I decided to try it out (again, for the [big number here] time). But this time I was determined to make it work. I bought a book, created a bunch of test projects and learned a lot about it! Today, I can’t think of starting a new project without it.
This post is the first one on what will probably become a series of posts about the lessons learned on using Maven with Eclipse, from single simple projects to huge enterprise multi-module projects. The code for this example can be found in the blog repository in github.
I started to use SpringSource Tool Suite (STS), that comes with Maven. STS uses M2, that’s a Maven plugin for Eclipse. If you don’t want to use STS, you can download and use this plugin and you’ll have the same functionality that I’ll describe here. You’ll also need to download Maven separately. It won’t make any difference for what we’ll do in this project but I highly recommend adding Maven bin directory to your command line path. Most of the time, when using M2 you won’t need to run Maven from the command line, you can run it directly from within Eclipse.
## Creating a new Maven Project
To create a Maven project using M2 is very simple. If you don’t have a specific archetype to use (most of the time you won’t have one), these are the steps you need to follow:
Step 1 - Start new project wizard
Start the create new project wizard, either going to the menu File > New > Other… or {Right Click on Package Explorer} > New > Other….
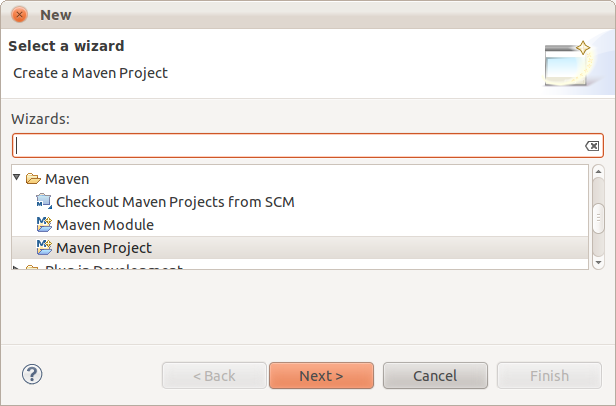
Step 2 - Select Maven Project
From the list, select Maven > Maven Project and click Next.
Step 3 - Select Project Location
On the next screen, check the Create a simple project checkbox to skip archetype selection.
If you want to put your project somewhere other then your workspace directory, you can select where you want it to be. In this case, I’m setting up a different directory.
Click Next

Step 4 - Give your new project a name
Maven uses three coordinates to identify a project: group ID, artifact Id and version.
One Group can have many different artifacts, for example, Group org.springframework contains the many different artifacts for the Spring Framework project.
The artifact ID identifies the artifact that will be generated by the project. Normally this is the same as the project name, but it doesn’t need to be. The artifact that will be generated by your project can be many different things, including (I’ll explain this better in a future post): POM, JAR, WAR, EAR, etc. It will depend on what your project is.
Each combination of group:artifact can have more than one version. When you create a dependency between two projects, you need to say what version you want to use (or use LATEST or SNAPSHOT, if you feel adventurous). If you release a new version of your artifact, people that didn’t use LATEST need to explicitly change their dependency declaration so that they’ll use the newest one.
On the Configure Project screen you’ll need to give your project all three coordinates and also a name and a packaging type. As I already mentioned, most of the times you’ll use the project name the same as the artifact ID, but that’s not a requirement. The packaging type in this case I selected WAR, meaning that I’m creating a web application. Maven knows, from this, what it needs to generate and how to package the contents of the project. M2 will also use the Maven Eclipse plugin to generate the .project, .classpath and other configuration files that Eclipse needs to import your project to your workspace.
It’s also a good practice to give your project a meaningful description.
Click Finish
Project Structure
After your project is created and imported, you’ll see the following structure:

Maven creates four folders for source files and add them as source folders. It also generated a fifth source folder, main/webapp, this is the root of your web application, where you’ll put all your resources: html, javascript, etc. It also created a WEB-INF folder, as expected. It didn’t generated the web.xml, so you’ll need to do that yourself.
To create your own web.xml file you can {Right click the WEB-INF folder} > New… and select XML File. The following is an example of an empty web.xml file that uses the new 3.0 servlet specification:
<?xml version="1.0" encoding="UTF-8"?>
<web-app xmlns="http://java.sun.com/xml/ns/javaee"
      xmlns:xsi="http://www.w3.org/2001/XMLSchema-instance"
      xsi:schemaLocation="http://java.sun.com/xml/ns/javaee http://java.sun.com/xml/ns/javaee/web-app_3_0.xsd"
      version="3.0">

      <!-- Add your stuff here -->

</web-app>